

Tutorial: Making A 1950s Style Sun Hat From Placemats.
This blog post came about after a visit to a charity shop this week where I found a bag of new placemats and since they came to just £4 I decided to buy them and find something to do with them.
I’d seen a couple of vintage patterns on Pinterest for foldable 1950s sun hats that I had wanted to try, see inspiration photos below, and the placemats seemed perfect for that. Read on for my step-by-step tutorial on how to make a 1950s sun hat.

For this project you will need: A couple of large round placemats, sewing thread and needle, some sewing pins, ribbon or thin elastic.
Step 1: Start by folding one placement in half.
Step 2: Mark the centre of your placemat & fold one side into that centre mark. Pin the folded side in place.
Step 3: Repeat with the other side. This will create a cone shape. You might need to try a few times until you get the right size and shape that you like and that is wearable.

Step 4: Once you are happy with the size of your sun hat, sew the folded pieces in place to secure them. I hand sewed mine.
Step 5: Now remove the trim from the other placemats. I used my unpicker to do this quickly.
Step 6: Sew the saved trim onto the hat for decoration anyway you like. The great thing is usually placemats have trim on the edge already so it saves you some work!

Step 7: For the fastenings, flatten the hat and mark 2 spots on the front side, about an inch from each edge. Then cut one hole and immediately hand sew around edge to reinforce it and stop the placemat splitting. Then do this again with the second one.
Step 8: Then choose a ribbon and feed it through the holes and make sure it is long enough that it can be tied under your chin in a loose bow.
Step 9: But if that all sounds a bit too fiddly just add elastic to the underside of the hat. I did on that for my sliver hat and it worked really well, see below.
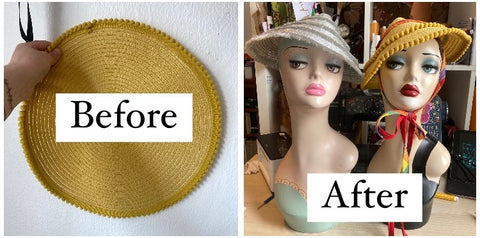
 Finished hats: I ended up making 2 hats as I had picked up 2 sets of placemats. For the sliver hat I added several rows of the trim to give it a raffia sort of look. I hope you enjoyed this tutorial and do tag me on Instagram on @sarahsdoowopdos if you try it as I’d love to see what you create!
Plus, don’t forget you can also shop my true vintage & refashioned hats here.


